
Grammarly is an automated grammar tutor and writing revision tool for academic writing. When you run your writing through Grammarly, it employs multiple grammar, spelling, plagiarism, vocabulary, and composition style checks to help you ensure your writing is at its best.
The basic account is free and the premium account is
fee-based, but you don’t have to worry about that because the USA Library
provides access to Grammarly@EDU for free! Simply go to grammarly.com/edu
(the link is on our library website’s Referencing page) and
sign up with your usa.edu email address to get all of the premium features for
free.

Ignore everything on the webpage except for the Sign Up and Log In links. Clicking on anything else will take you out of the grammarly.com/edu webpage, which is where you must be to get the EDU account.
Once you have logged in to your Grammarly account, you will be taken to your account dashboard. There will be a Demo document with a sample piece of writing already on your dashboard. If you wish, you can click on it and go through the document to see how Grammarly checks for writing and plagiarism and to familiarize yourself with the different capabilities.
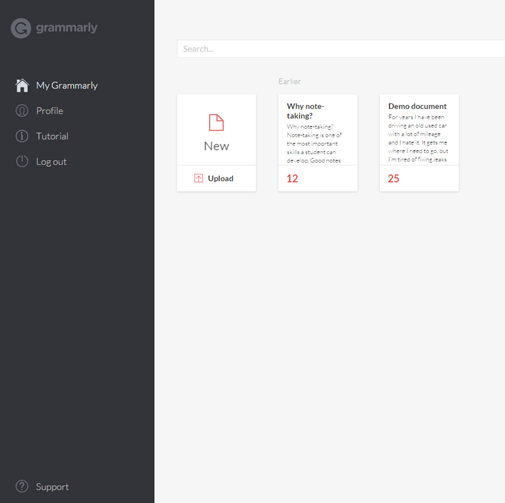
The menu is located on the left, with the Support link at the bottom. Click on Tutorial to launch a helpful walk-through of all of Grammarly’s icons and features. The green headings on the left are different sections within Grammarly’s tutorial.
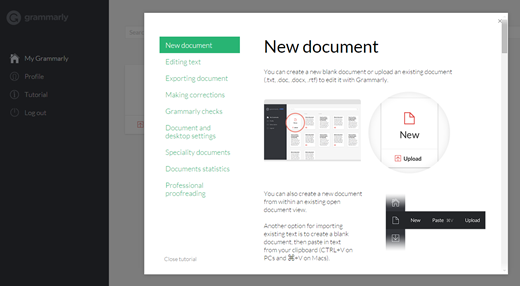
To use Grammarly, click on the New icon to open a new
document, where you can copy and paste your text, or click on Upload below the
New icon where you can upload your preexisting document. As you add different
pieces of writing, documents will be arranged on your desktop, newest first.
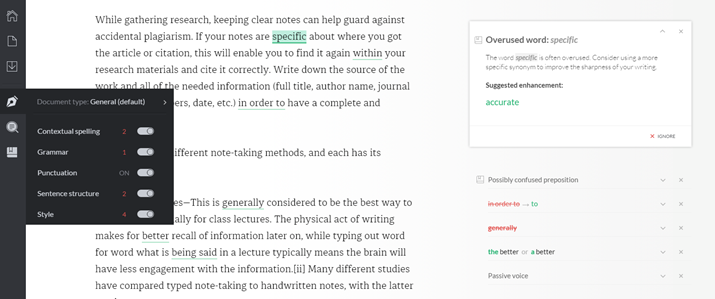
Grammarly will underline and highlight words or phrases that need changing. Click on a heading on the right side of the page to expand the problem’s ‘card’ and read why Grammarly thinks you should change it. If you agree with the suggestion, click on the card to apply the change. Click Ignore and Grammarly will never view it as a problem again.
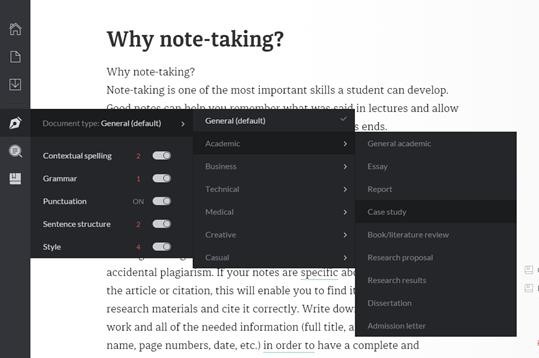
From the left menu, you can view and select the different types of grammar and style checks Grammarly runs by clicking on the icon that looks like a fountain pen nib. You can change the document type from General (default) to whatever type of document you choose, which will enable Grammarly to judge your writing depending on its purpose.
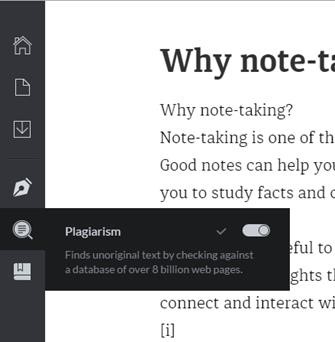
By default, Grammarly does not automatically run your writing through its plagiarism checker. To turn this option on, go to the magnifying glass icon in the menu and click on the toggle. Grammarly will then do a scan of the Internet to see if your text was copied without attribution.
At the bottom of the document page is your word count, the number of issues, and the score Grammarly gives your writing. Clicking on the score opens a window with Grammarly’s report of your writing. It gives you the option of downloading a detailed report, which is something you can have your students do if you want them to show you they’re using Grammarly for their assignments.

In addition to its powerful website application, Grammarly also provides free browser extensions for Chrome, Firefox, and Safari. These can be downloaded from your browser’s extensions or web apps store. Once installed, Grammarly will check your writing directly on other websites without you having to create a new document in your Grammarly account.

Grammarly extension on Google Chrome
Grammarly has a free add-in for Microsoft Office Suite which enables you to have your writing checked directly in your Word doc or Outlook email. View a video about this here. At the moment it is only available for PCs; Mac users will have to stick to using Grammarly online and in their browser.
 |
| Grammarly add-in for Word |
 |
| Grammarly add-in for Outlook |
Grammarly Support — search topics and answered questions, view FAQs, or submit a question
Polling Tools
This week, we’re presenting you with two great polling tools to be used in and out of the classroom, each one with their own distinctive approach to engaging students: Straw Poll and Poll Everywhere.
Straw Poll is a simple yet easy and effective browser-based app to create online polls for students to participate and respond in real time. No registration or log in is required to use Straw Poll, and you can immediately begin creating polls when you enter the website at https://strawpoll.me/.
While there is no mobile app available, the website is mobile-friendly to both iOS and Android users.

Straw Poll provides a straightforward, notebook-inspired look to engage students. You create a poll by typing the question to be answered as well as the responses that will be available to students to choose from in a multiple-choice format. You can adjust the poll so that students can choose multiple options or remain limited to one poll option. Straw Poll also includes a Duplication Checking feature to prevent participants from submitting multiple responses. You can also require students to solve a CAPTCHA before inputting their responses, so as to help avoid any poll tampering.

Once the poll is created, Straw Poll provides you with a unique URL to share with students on your course page, directing them to the poll’s webpage to submit their responses. This webpage also allows access to you and participants to the poll results. These results are presented in simple percentages as well as a pie chart. Individual participants cannot be identified, so Straw Poll works better as an uncomplicated way to get feedback from students and receive class input on what subjects need to be addressed further.

Signing up for an account is easy and free at https://www.polleverywhere.com/. It requires only your name, a username, email address, and password. Poll Everything even offers a free higher education account with additional special features. Just click the checkbox identifying yourself as an educator during the sign up process.
With a free Higher-Ed
account, you can create an unlimited number of polls. Each poll can receive up
to a maximum of 40 responses. Polls can be reused from lecture to lecture or
from term to term, however, by clearing out the previous poll responses. Poll
responses can be configured so that students can respond a limited number of
times or as many times as they like. You can also schedule when the poll is
available or “unlocked” for students to begin responding, or when to have it
closed from further responses.
Creating a poll
starts with writing a question for participants to answer, but Poll Everywhere
provides you with a variety of options for how participants can answer that
question. Polls can be designed to be multiple choice, open ended, Q & A
styled, and clickable images which you can upload directly. Responses can be
displayed as text walls, word clouds similar to Wordle, and more. Poll
Everywhere also offers a downloadable Presenter App allowing you to embed your
poll on a PowerPoint slide and show responses in real time. Students can respond from almost any device without having to sign up or
log in. Once you have created your poll, the website automatically provides you
with a unique URL that you can share with students on your course page,
directing them to a webpage where they can input their responses. This unique
webpage is mobile-friendly, so students can access it anywhere from their
computers and mobile devices. Students can also text their responses by texting
your username to the generic number 22333 to join your poll session, followed
by texting their response. You can also connect the poll to your Twitter
account if you want students to be able to tweet their responses.
Students can respond from almost any device without having to sign up or
log in. Once you have created your poll, the website automatically provides you
with a unique URL that you can share with students on your course page,
directing them to a webpage where they can input their responses. This unique
webpage is mobile-friendly, so students can access it anywhere from their
computers and mobile devices. Students can also text their responses by texting
your username to the generic number 22333 to join your poll session, followed
by texting their response. You can also connect the poll to your Twitter
account if you want students to be able to tweet their responses.The free version of Poll Everywhere doesn’t allow users to identify their participants, which prevents you from collecting participation statistics or grading individual responses. But it remains an effective classroom tool for brainstorming ideas, receiving feedback from the class, and even presenting practice quiz or exam questions to measure students’ understanding of a given subject matter. Its applications are similarly useful beyond the classroom for staff and administrators during meetings and presentations, such as Q & A sessions and marketing campaigns.
Feel free to look at a
poll I created using Poll Everywhere which I featured in the screenshot above
to explore how participants submit responses by entering the following URL: pollev.com/matthewchase910. Or, text my username “matthewchase910” to join the poll and then
text your response.
Poll Everywhere provides a
FAQs page addressing the different features available through the app, as well
as User and Edu guides to maximize your poll-creating skills. You can find it
all here: https://www.polleverywhere.com/faq.
Screenshots in this
email were taken from a computer, but both the Straw Poll and Poll Everywhere
websites are iPad and Android user friendly. Presentation Tools
There are a staggering amount of presentation makers and
tools out there, but we chose to focus on these four: Educreations, Emaze,
Haiku Deck, and Prezi.

Educreations allows you to screencast whiteboard videos from your iPad or computer. The app is free to download and requires you to create an account as either a teacher or student in order to make and share videos. You can sign up with email, Facebook or Google+. The Basic account is free, while the Pro accounts cost extra and have more options and tools. For example, you can only import images onto your whiteboard slides with the basic plan, while with the Pro plans you can import other document types such as PowerPoint slides or webpages onto your whiteboard. Educreations is the only presentation tool featured in this email that allows basic plan users to make their presentations private.
 |
| Educreations dashboard, browser |
 |
| Educreations dashboard, iPad app |
To make a video lesson with Educreations, record yourself
speaking while drawing on the whiteboard and any imported images with your
finger or stylus (iPad/tablet) or computer mouse (browser). You can create
videos from the Educreations iPad app or from within your browser in your
Educreations.com account, which allows you to make videos from your desktop
or laptop computer or on a non-iPad tablet. However, the whiteboard
options in the browser are much more limited, as explained in the whiteboard
screengrabs from both computer browser and iPad, below.
 |
| Educreations whiteboard, browser |
 |
| Educreations whiteboard, iPad app |
The videos can be shared with anyone from within your Educreations account. Your audience does not need to have an Educreations account or app to view your lesson videos; simply send them a direct link. Instructors can make videos to teach concepts or lessons to their students, or students can create presentations on their topics in order to show what they've learned. Here is a video I made with Educreations about how to find the Tech Tools page on our library website.

Emaze has pre-made
templates to help you make beautiful, professional-looking presentations in a
short amount of time. What sets it apart is the graphics and video-like
animations of the presentation templates that take it beyond a simple
slideshow. Emaze is a web-based application and can be used on a computer or
tablet, although at this time there are not any dedicated smartphone or tablet
apps. You can import existing PowerPoint slides to your presentation and/or
save it as a video, if you so wish.
 |
| emaze website |
As with many other apps and tools, the basic plan is free, and premium plans have more capabilities along with higher prices. For instance, all presentations made on a basic account are public; only premium users can make private presentations. If you sign up for an Emaze account with your .edu email account, you can get an education discount for the Premium plan ($2.90 a month instead of $9 a month).
 |
| emaze dashboard |
Upon first glance, Emaze may seem very similar to Prezi, but
its presentation maker is a bit more user-friendly and requires less time to
learn all the ins and outs. You can choose to create an out of the norm
presentation with a 3D animated template, or stick close to the familiar
slides. Emaze also does not have any tablet or smartphone apps and is entirely
in-browser.

Haiku Deck is a
simple to use presentation slides maker that has many layouts, graphics and
millions of free stock images to choose from. An account is required, and you
can sign up with your Twitter or Facebook account as well as by email. Haiku
Deck has iPad and iPhone apps and can also be used in your computer browser.
Currently you can only create decks on the iPad app or from within your
browser in your haikudeck.com account. The iPhone app can be used to view decks
and can turn your iPhone into a remote when you are presenting your deck.
 |
| Haiku Deck dashboard, browser |
 |
| Haiku Deck dashboard, iPhone |
Per usual, the basic plan is free, while there are also Edu
(sign up with your .edu email), Pro and Volume plans with more capabilities for
varying prices. For instance, if you have a basic plan, any deck you make will
be public; privacy settings are a premium-only option.
 |
| Haiku Deck dashboard, iPad |
Although it is a pricey premium feature that is still in its
beta stage, Haiku
Deck Zuru is very interesting and has the potential to save you time and
work. It uses artificial intelligence to turn your presentation slides into a
completed deck. All you have to do is upload your PowerPoint or Keynote
presentation or an outline from your Evernote account, and the AI goes through
the text and images on your slides to see which template and background images
would work best for your deck.

Prezi takes the video-like animations
of Emaze's slide transitions to a whole new level by doing away with slides
altogether. Each Prezi presentation is held on one large image, and the various
information items (the stuff on each slide in a normal presentation) are
located on a different part of the image. Clicking the 'next' button on a Prezi
causes the focus to zoom on a different aspect of the Prezi canvas, making for
a visually stunning and memorable presentation.
 |
| Prezi dashboard, browser |
 |
| Prezi Viewer, iPhone app |
You can download desktop apps in order to work on your
Prezis offline (Prezi is an in-browser application). There are also Prezi apps
for Android and iPad, and Prezi Viewer for iPhone. Prezi’s iPad app
differentiates between Prezis made online and Prezis made on the iPad, as seen
in the icons at the bottom of the dashboard (below).
 |
| Prezi dashboard, iPad |
Prezi's basic plan is free but there are no privacy controls
or logo customization options. We recommend signing up for a Prezi account with
your .edu email address, as the education plans are free or discounted with
longer free trial periods. As the presentation tool with the highest learning
curve, Prezi offers a generous amount of support—for users with any plan above
basic.
Quiz Tools

Quizlet is a free educational app in which you can create and customize study tools for your students in the form of flash cards, practice tests, and memory games and activities. While the Quizlet website can be accessed on a computer and is optimized to be mobile-friendly, mobile device users can also download the app to their iOS or Android device.
Create a free account at https://quizlet.com/. All you need to sign up is your email, a username, and a password. You can also sign up through your Facebook or Google account.
Your students do not need to sign up
for Quizlet to access these study sets, and you have several ways to
share them. You can share study sets through social media via Facebook,
Twitter, and Google Classroom, or you can email study sets to your students.
Quizlet also provides you with a shortened URL or HTML snippet that you can
embed on your course page, website, or blog. You can also create virtual
classes on Quizlet, in which you can add students (they will need sign up for
Quizlet accounts) and study sets for them to use.
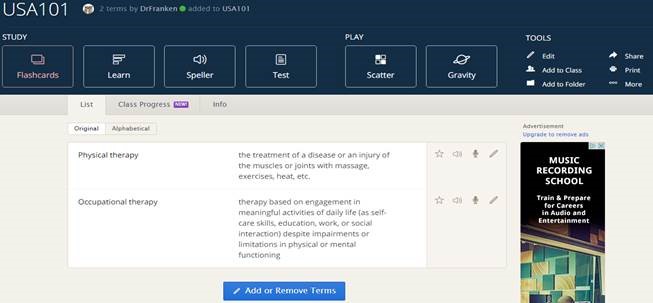
Don’t have time to create your own study sets?
No problem. You can browse through the diverse selection of study sets created
by other users. Several study sets on topics of occupational therapy and
physical therapy are already available for both you and your classes with just
a few clicks.Quizlet supports a comprehensive Help Center where you can learn more on how to create and share study sets, add classes and students, etc. You can find it here: https://quizlet.com/help
JeopardyLabs is another useful quiz tool for instructors. As its name suggest, this app allows you to create quizzes styled after the classic Jeopardy! gameshow. No need to register or log in. It’s fun, simple, and free. You can access the website on any computer or mobile device. Start building your own Jeopardy quiz at https://jeopardylabs.com/.
To begin, JeopardyLabs asks for you to create a password for
your quiz template, so you can come back to it if you want to edit it further.
Reflecting the traditional Jeopardy gameshow format, you are provided with five
quiz categories that you can title and add specific questions and answers to.
You can also adjust the scores for each question to emphasize importance of key
concepts and lessons from your instruction. You can share this with students
for individual studying purposes or use in class as a group activity with
assigned teams. Here is a template I created using JeopardyLabs.

Once you’re done customizing the quiz, you can save the template as public domain on the website. JeopardyLabs provides you with the URL address that you can share with students, as well as an HTML link that you can embed on your course page, website, and/or blog. Students can also download the quiz and use it offline.
Like Quizlet, you don’t need to create your own quizzes. All
templates on JeopardyLabs are publicly available, and there are several quizzes
on physical therapy and occupational therapy already created for your
convenience. You can even duplicate a template that you like and edit it as
your own.
JeopardyLabs has a FAQs page addressing the different
features and options available through its website. You can find it here: https://jeopardylabs.com/about/.
All screenshots and images were taken from a computer, but both
Quizlet and JeopardyLabs are mobile-friendly to iOS and Android users.

Remind is a free texting
app that allows you to instantly connect with your students. Communicate easily
with an entire class via instant text messages, all while your phone number is
kept private as well as your students’. You can send out anything from exam and assignment
reminders to announcements or even motivational messages instantly and efficiently. Remind can
be accessed from anywhere on any device: phone, tablet, and computer.
Once you have an account, you can then immediately start creating
a virtual “class” and adding students to it. There are a variety of ways to add
students. You can send personal invitations to students via their email address
or mobile number. You can share a URL link to the virtual class through an
email, a post on the MyUSA course page for your class, or on your syllabus.
Last but not least, you can provide in-class instructions for students to
subscribe via text, as they enter a randomized phone number and text the code
to subscribe.

You can message either the entire class at once, or to individual students. Students will receive these messages and announcements by text, email, or push notification on the app. This is great if you want to check in on the progress of a student, or to send an announcement to everyone. You can also schedule messages days or weeks in advance for exams, class time changes, and more. With a few clicks or taps of a button, you can schedule reminders for all assignments and tests before the semester even starts and let Remind do some of the work for you.

Remind allows you to attach images, documents, presentations, and PDFs which you can send to the entire class from your mobile device or a computer. You can even use the app to record voice messages and send them to students. Both you and your students can save announcements and message history to your email anywhere, at any time.
Faculty and staff can also use Remind to communicate instantly and conveniently with each other. This app could be a very helpful tool for professional networking, sharing resources and opportunities, and collaboration.
Remind provides a number of useful how-to videos online to help
you use the app to its fullest potential, whether it is managing and messaging
multiple classes, sending announcements to a class or individual students, and
so much more. You can check them out here: https://www.youtube.com/user/remind101/videos.
You can also find written instructions on the different features
of Remind through their FAQs page: https://remind101.zendesk.com/hc/en-us.
Screenshots in this email were taken from an iPad, as the Remind
app is readily available to both iOS and Android users.

SimpleMind+ is a mind-mapping tool that is available across all platforms and devices. You can use it to create mind maps, structure your ideas, and for brainstorming. The apps are free to download, but if you want to get the desktop versions, they cost €23.99 ($26.22) and up, depending on number of users and platforms (Mac and Windows bundles are available). SimpleMind offers a 30-day free trial for its desktop versions, so you can try it out before deciding whether to commit. The paid Full versions of SimpleMind+ have additional features such as sharing and collaborating in mind maps and connecting with Dropbox, which allows you to save maps and sync across devices.
Opening the SimpleMind+ app launches the mind map creator. It will prompt you to name the first text box, which will be the main idea for your mind map. Each text box will have tiny icons around it, which are for adding new boxes to branch out from the first one, adding a text note, and copying/cutting/pasting, etc.
You can move each text box by dragging it around with your finger/stylus/mouse until it is in the position you want it to be. Press and hold a text box to select it and its ‘children’. If you accidently tap the "add" icon and an unwanted bubble pops up, you can get rid of it by tapping once on the white space away from it. You can also choose from many color palettes, and the mind map can be in a free form or horizontal layout.
Using SimpleMind+ is fairly simple once you get the hang of it. To help speed up the learning curve, SimpleMind's website has a good amount of how-tos and support. It also has its own YouTube channel, with tutorials on just about every aspect of the app.
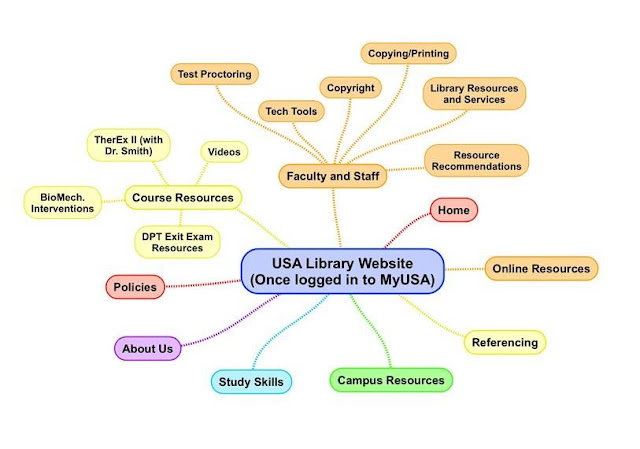
Here is a mind map I made about the library website's organization and webpages before logging in to MyUSA:


SimpleMind+ is a mind-mapping tool that is available across all platforms and devices. You can use it to create mind maps, structure your ideas, and for brainstorming. The apps are free to download, but if you want to get the desktop versions, they cost €23.99 ($26.22) and up, depending on number of users and platforms (Mac and Windows bundles are available). SimpleMind offers a 30-day free trial for its desktop versions, so you can try it out before deciding whether to commit. The paid Full versions of SimpleMind+ have additional features such as sharing and collaborating in mind maps and connecting with Dropbox, which allows you to save maps and sync across devices.
 |
| SimpleMind+ on iPhone |
Opening the SimpleMind+ app launches the mind map creator. It will prompt you to name the first text box, which will be the main idea for your mind map. Each text box will have tiny icons around it, which are for adding new boxes to branch out from the first one, adding a text note, and copying/cutting/pasting, etc.
 |
| SimpleMind+ on iPad |
You can move each text box by dragging it around with your finger/stylus/mouse until it is in the position you want it to be. Press and hold a text box to select it and its ‘children’. If you accidently tap the "add" icon and an unwanted bubble pops up, you can get rid of it by tapping once on the white space away from it. You can also choose from many color palettes, and the mind map can be in a free form or horizontal layout.
 |
| multiple selection applied to Home branch (iPad) |
Using SimpleMind+ is fairly simple once you get the hang of it. To help speed up the learning curve, SimpleMind's website has a good amount of how-tos and support. It also has its own YouTube channel, with tutorials on just about every aspect of the app.
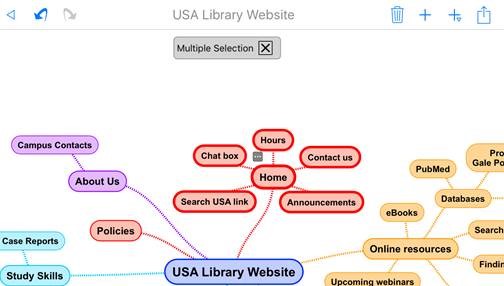
Here is a mind map I made about the library website's organization and webpages before logging in to MyUSA:

…and after logging in to MyUSA:


To get Skyro, you can search for it in the Google Play
store, but be aware that it is simply called “Voice Recorder” by Triveous in
the Google Play Store. You can also go to Skyro’s website and download the app
directly.

Once the app is downloaded onto your Android device, you can start recording instantly. The microphone button starts the audio recording. Skyro allows 4 hours of recording with the free version of the app. If you run out, you can delete old recordings you don’t need anymore, or that you have saved elsewhere, to free up space.
While you are recording audio, you can take photos with your
device that go along with the audio. Skyro will note what time the photo was
taken and insert it into your recording at the appropriate time. This is a
great feature if, for example, you are at a conference presentation and want to
record what the speaker is saying and also want to take a picture of the
speaker’s presentation slide. The slide and the audio will sync automatically
based on when you took the picture. You can also opt to add or delete pictures
later.
Once you have saved the recording, you can
rename it and tag it. Skyro has five preconfigured tags: Work, Personal,
School, Family, and Important, but you can also press the “Manage tags” button
to add your own categories.
Finally, you can share the finished recordings with others. How you can share your recordings depends on what other apps you have installed on your Android device. Standard options include Google Drive, email, and text messaging. I’ve attached a Library Tour recording to this email so you can get an idea of Skyro’s capabilities and applications.
·
Create an audio letter to a friend or family
member and include pictures
·
Record stories and oral history from interesting
family members or people in your community. Take their picture to include a
face with the voice
·
In a meeting or at a conference, record a
presentation (with permission!), and take pictures of slides or other visual
materials
·
Interview subjects for a research study. Use the
photo aspect to take a picture of the participant number so you can easily
differentiate interviews later

Storyboard That is a website that allows you
to communicate ideas and projects in a visually interesting way. Create digital
storyboards easily to add a unique graphic component to your class instruction.
Storyboard That can be accessed on a computer, iPad, or Android device with no
additional software needed.
Create an account and begin storyboarding for free at https://www.storyboardthat.com/. All you
need is an email, a username, and password to get started.
With a free account, Storyboard That allows users to create and
save up to two storyboards per week. You will have access to over 45,000 images
to choose from to make your storyboards. These images include an assortment of
different scenes and backgrounds, poseable characters, props and shapes, and
more. You can also add textable dialogue in the form of speech bubbles and
blocks of text.

The website’s Storyboard Creator presents you with a simple drag-and-drop interface where you can add to and manipulate the storyboard “cells” with scenes, characters, and other images to make up a story. With the free version, you can choose to have 3 or 6 cells for your storyboard. Most images are very adjustable in color, size, position, etc.
Once you have a storyboard finished, you can then start sharing
your work with others instantly. There are a variety of ways that you can share
and present storyboards to your class. You can do so via email, social media
(e.g., Facebook, Twitter, etc.), or embed it on your blog or a course webpage.
While users with free accounts can download their storyboards as a PowerPoint,
printable PDF, or a JPEG image, Storyboard That places a faint watermark on
each cell. One way to avoid the watermark is to take a screenshot of the
finished storyboard on the website. You can also print out the storyboard
without the watermark.
The image below is a storyboard
I created to demonstrate the various features included in the Storyboard
Creator.

Faculty can use their storyboards to introduce difficult concepts, to provide motivational support for students, or to have students create their own storyboards to reflect on what they learned in class. It can also be used by faculty and staff alike to create interesting graphical flyers and presentations for events, projects, and activities on campus.
You can find many useful online resources to create your own
unique storyboards. Storyboard That has made a tutorial video on its different
features: https://www.youtube.com/watch?t=140&v=zsDryTkqdrY.
They also provided a printable, one-page guide on how to get
started navigating the Storyboard Creator: http://sbt.blob.core.windows.net/site-images/help/storyboard-that-quick-start-guide.pdf.
Screenshots in this email were taken from a computer, but the
website is also iPad and Android user friendly.
Video Tools
This week’s Tech Tools email features two free tools to help you create video presentations online: Screencast-O-Matic and PowToon.
You can use these tools to quickly and easily create short tutorials, marketing videos, introductory class videos to post on Blackboard, provide audio feedback on a student’s work, and so much more! You can even have your students use them to create videos for class projects.

Screencase-O-Matic is a free screen and webcam recorder that lets you record your computer's screen activity with voice over commentary. It's a web-based program that works with both Macs and PCs. To get it set up, you only need to install the recorder and then you can immediately start recording.
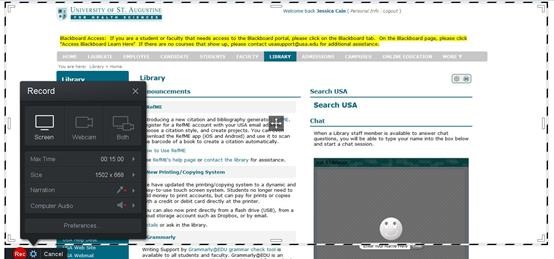
The image to the right shows you how the recorder looks on your screen when it's launched. You can choose to record your full screen or only a section.
The free version allows you to record up to 15 minutes, while a Pro account ($12/month) allows for unlimited recording and gives you access to more editing tools.
Once you've recorded your video, you can choose to save it to your computer as a video file or you can upload it to YouTube or your Screencast-O-Matic account.
If you upload it to your Screencast account, you get the option to password protect the video so that only those you give the link and password to are able to view it.

Click the link below to watch a quick screencast I made on how to
access the citing online journals section from the AMA Manual of Style
eBook. The password for the video is: library. http://screencast-o-matic.com/watch/cDnhoUh8CE
(Note: Unfortunately, there is no sound in this video due to an
error with my microphone).
It only took me about 2 minutes total to record this video and
post it to my account. Screencast-O-Matic really is a great option for you if
you quickly need to make tutorials or presentations to send your students or
colleagues.

PowToon is a web based software that lets you create animated presentations and videos. If you're tired of using the same PowerPoint slides, try out PowToon for a more exciting presentation.

After you create an account, you can choose to make a presentation from scratch, selecting the themes, characters, music, and transitions that best fit your presentation.
PowToon is set up similar to creating PowerPoint slides, making it super easy to use.
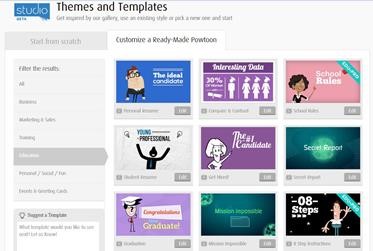
Or you can choose to simply edit one of their premade templates to suit your needs.

Once you've finished, you can share your PowToon as a video to Vimeo or YouTube. Unfortunately, you can only download it as an MP4 with a premium account.
You also have an option to save and present your PowToon as a slideshow presentation or export the slide as a PDF.
Here’s an example PowToon created by Appleby College to explain how OneNote Classroom Binders work for students: https://www.youtube.com/watch?v=WV_xvZEnPMU
And here’s an example of how a Faculty member at the University of
North Florida used PowToon for an introduction to her Health Psychology course:
https://www.youtube.com/watch?v=92IwQeF01Fw
PowToon has a series of quick tutorials available on their
website: https://www.powtoon.com/tutorials/
You can also find a lot of helpful tips on their YouTube
channel: https://www.youtube.com/user/PowToon

Wordle.net is a website where you can make word clouds, graphic depictions of the words in a block of text. The size a word appears in a wordle has to do with how many times it is used; the more a word is used, the larger it appears in the word cloud.
Some practical applications for wordles include using them
as concept maps, idea generators or visual overviews, as a way for those who are
more visually minded to interact with otherwise static text. Wordles can be
used as an assessment tool by distilling the main ideas in a discussion, or
condensing responses to a poll or survey. You can create an exercise by making
a Wordle of an article and asking students whether the word cloud accurately
represents the main points of that topic. Students can create their own wordles
as reflection tools at the end of the term. And of course, wordless can be used
as unique graphics for presentations and flyers.
The Wordle application runs on Java, which you will need to
have installed and be able to run on your browser. Chrome has blocked Java, but
Firefox and Internet Explorer will let you make wordles.


The Create page has a text box where you can copy and paste the text or RSS feed you want to create a word cloud from. You can also manually type in the words you want to use. Once the wordle has been created, you cannot edit the text, so edit as desired before clicking Go.
Wordle will automatically separate all non-hyphenated words, so if you want to see two words listed together, type a tilde (~) between the instead of a space, like~this. Like~this will then be treated as one word.
Click Go, or Submit if you are creating a Wordle from an RSS feed link.

A Java popup will open. Click Run to run Java and create your wordle.

Your word cloud will be created. You can change its appearance by utilizing the editing menu at the top left of the wordle. If you are overwhelmed by all the choices, you can click Randomize to apply a randomly chosen layout, font, and color scheme to your wordle.

You can change the layout by choosing whether your wordle
will have rounder or straighter edges, or the direction its words will point.
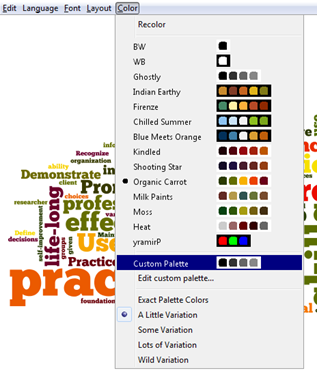
Similarly, the Color menu will change the text and/or background colors of your wordle, as well as the color variation.
You can choose a preselected color set, or you can select Custom Palette.

Click on Edit Custom Palette to change the individual colors. A small window will pop up. Click on each color to change it.

If you wish to remove a certain word from your created wordle, simply right-click on it. A small window will appear that says "Remove [word]"; click on it to do so.

In order to save your wordle, you can click on the "Save as PNG" button at the bottom right of your wordle, or you can simply take a screengrab of it.

Mac users have the option of saving the wordle as a PDF. Just click Print at the bottom left of the wordle, click on the PDF dropdown menu, then select Save as PDF.
And you are done! The example wordle made for this tutorial is of our Institutional Learning Outcomes:

For more ideas on how to use Wordle, check out the following
articles:
McNaught C, Lam P. Using Wordle as a supplementary research
tool. The Qualitative Report 2010;15(3):630-643. http://www.nova.edu/ssss/QR/QR15-3/mcnaught.pdf
No comments:
Post a Comment
Note: Only a member of this blog may post a comment.